

In this video, we walk you through controlling bleeding with direct pressure, and how to tell when bleeding is serious.
What you’ll learn
- Identify the three types of bleeding, and spot the dangerous one at a glance
- Apply direct pressure correctly — the one technique that controls almost all bleeding
- Recognize what the old first-aid classes taught that is no longer recommended
- Decide when a cut needs stitches, and when bleeding is a 911 call
Bleeding is the most common first-aid situation there is — and one of the most misjudged in both directions. A shallow scalp cut can pour blood and look like an emergency; a deep puncture can barely bleed and hide serious damage. The skill isn’t reacting to how dramatic a wound looks. It’s knowing what kind of bleeding you’re seeing, applying the one technique that controls nearly all of it, and recognizing the few situations that need more than pressure and a bandage.
The good news: modern bleeding control is simpler than what first-aid classes taught for decades. Current guidelines have stripped it down to what demonstrably works — firm, direct pressure on the bleeding point — and retired the rest.
This lesson covers the three bleeding types, the step-by-step control technique (with the video demonstration), what’s changed in the guidelines, and the escalation calls: stitches, ER, or 911.
How bad is it? Sizing up the wound
Blood vessels come in three sizes, and each bleeds differently:
Type | What you see | How serious |
|---|---|---|
Capillary | Slow ooze from a scrape or shallow cut | Minor — clots on its own with light pressure |
Venous | Steady, dark-red flow | Controllable with direct pressure; deeper cuts may still need stitches |
Arterial | Bright red blood that spurts or pulses with the heartbeat | Emergency — can be life-threatening in minutes; call 911 and apply hard pressure now |
That third row is the one to burn into memory: spurting, pulsing, bright-red bleeding is arterial, and it will not politely wait. Everything else in this lesson still applies — you just do it faster, harder, and with 911 already on the way.
How to Stop Bleeding: Step-by-Step
Check that the scene is safe — for you first. You can’t help while becoming the second victim.
Protect yourself. Wash or sanitize your hands and wear gloves from the first aid kit if available — bloodborne pathogens are a real risk in both directions. If the person is alert, they can press on their own wound while you glove up.
Expose the wound enough to see where the blood is actually coming from. Pressure works on the bleeding point, not the general area.
Apply firm, direct pressure on the wound with a gauze dressing, clean cloth — or a gloved hand alone if that’s all you have. Press hard enough to stop the flow. This is the whole technique: sustained, firm, directly on the source.
Hold it — without peeking. Clotting needs uninterrupted time. Lifting the dressing to check restarts the bleed. Hold continuous pressure for at least 10 minutes before reassessing.
If blood soaks through, add a second dressing on top and press harder. Do not remove the blood-soaked original — pulling it off tears away the forming clot.
Bandage it in place. Wrap a rolled gauze bandage over the dressing — snug enough to maintain pressure, not so tight it cuts off circulation. On an arm or leg, start wrapping at the end farthest from the heart and work toward the body (distal to proximal), which keeps the wrap from trapping blood in the limb.
Escalate if it isn’t working. Bleeding that continues despite firm pressure through two dressings is beyond home control — call 911 for severe bleeding, and see the tourniquet note below for life-threatening limb wounds.
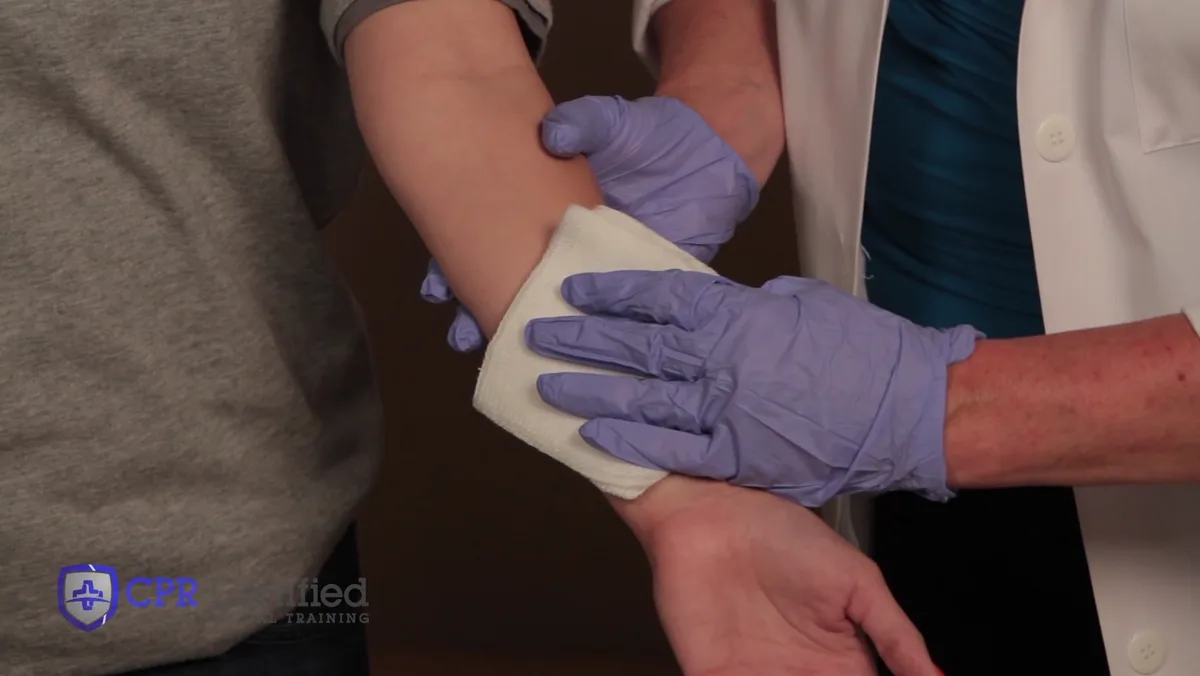
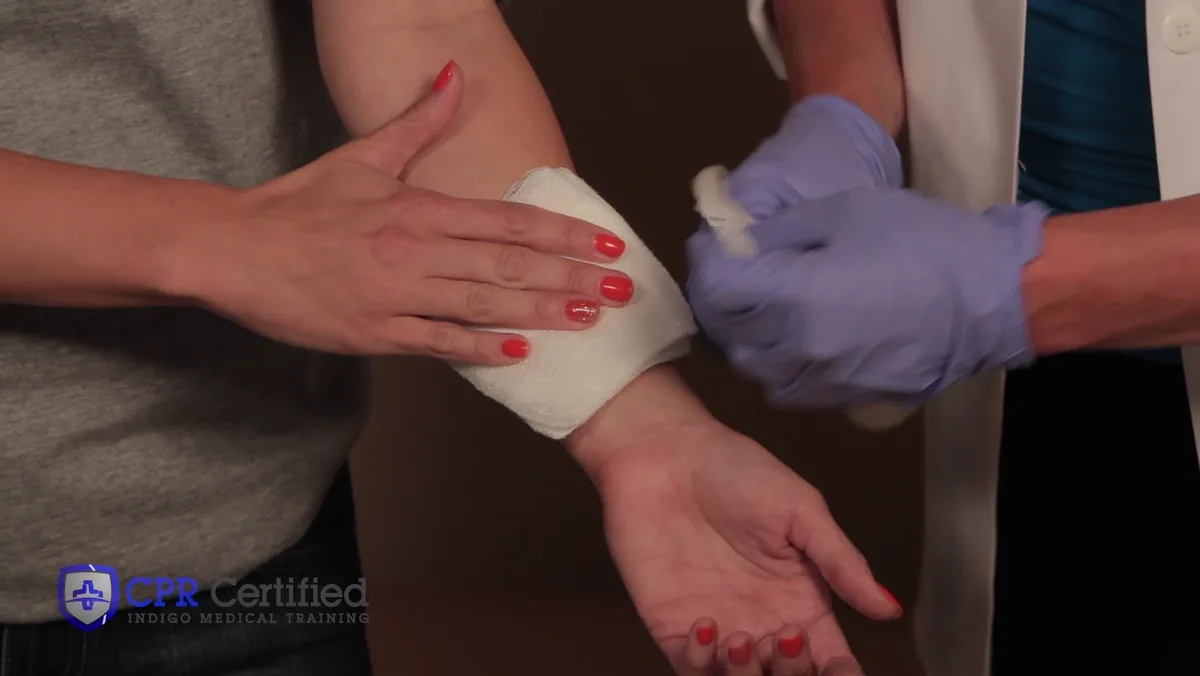
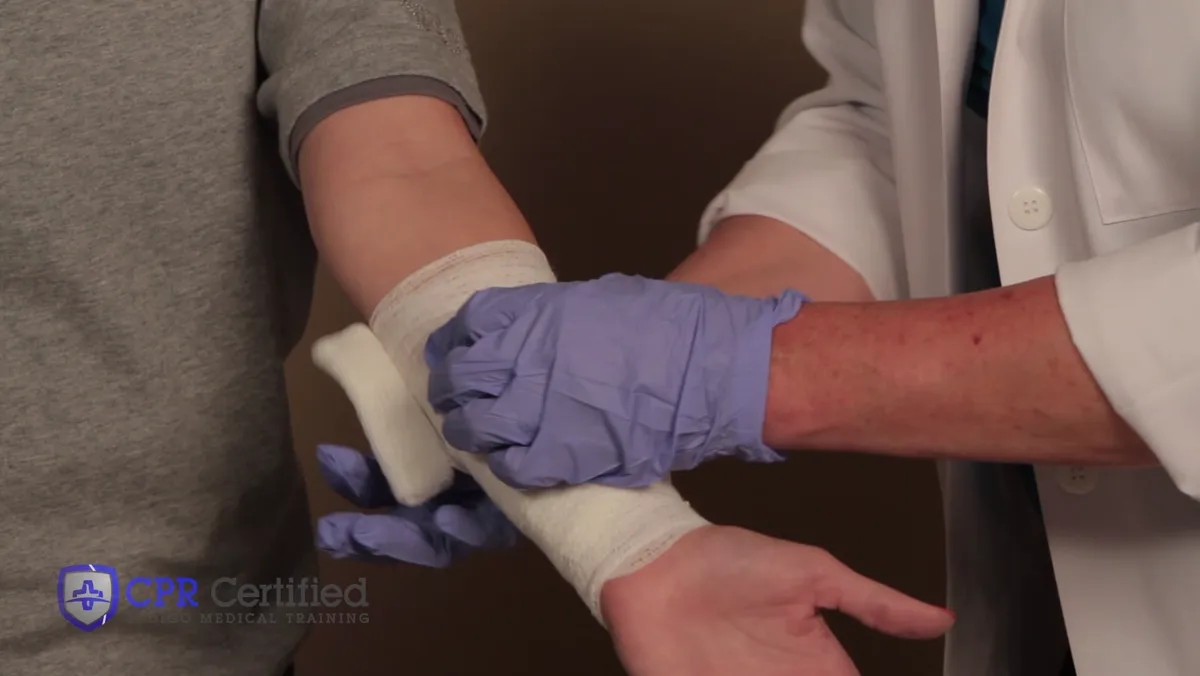
What the old first-aid class taught — and what’s changed
Bleeding control is where outdated advice survives longest, because most of it sounds sensible. If you took a first-aid class years ago, you probably learned a whole toolkit: elevate the limb, press the pressure point, tourniquet only as a desperate last resort. Current guidelines have simplified all of it to what the evidence supports.
Elevation is out. Raising the wound above the heart was standard teaching for decades — but studies never showed it meaningfully slows bleeding, and repositioning wastes time and can worsen other injuries. Elevation still helps with swelling in minor injuries; it’s just no longer part of stopping blood.
Pressure points are out too. Squeezing the artery upstream sounds clever, but pressure points are hard to find under stress — and pressing near the wound steals force from pressing on it. Lay first-aid guidance has retired them: direct pressure on the bleeding point beats indirect pressure every time.
And the tourniquet went from villain to hero:
One more piece of the old toolkit to retire: hydrogen peroxide and rubbing alcohol don’t belong on open wounds — they damage the healing tissue. Clean a wound afterward with plain running water and mild soap around (not in) it.
Nosebleeds: the everyday special case
The most common bleeding emergency in most households is also the one most people treat wrong.
A nosebleed that won’t stop after two full rounds of pressure, follows a head injury, or comes with dizziness needs medical attention.
When a cut needs stitches — and when to call 911
See a doctor promptly (the stitches window is roughly 6–8 hours) for a wound that:
Is gaping open, deep, or longer than about half an inch
Has edges that won’t stay together, or fat/muscle visible
Is on the face, or across a joint (scarring and movement both matter)
Was caused by an animal or human bite, or a dirty/rusty object — bites and contaminated wounds also raise the infection and tetanus questions below
Still oozes after a full round of proper pressure
Call 911 for:
Spurting, pulsing, bright-red (arterial) bleeding
Bleeding that soaks through dressing after dressing despite firm pressure
An amputation — control the bleeding first with hard direct pressure; wrap the severed part in clean gauze, seal it in a plastic bag, and put that bag on ice (never the part directly on ice); it travels with the patient
A deeply embedded object — do NOT pull it out; it may be plugging the wound. Press around it, bandage around it, and let the ER remove it
Any bleeding with shock signs: pale clammy skin, rapid weak pulse, confusion, faintness
Aftercare: from bleeding to healing
Once bleeding is controlled and the wound doesn’t need professional care:
Clean it — plain running water over the wound; mild soap for the skin around it; no peroxide, no alcohol in the wound itself.
Protect it — a thin layer of petroleum jelly or antibiotic ointment keeps the wound moist (moist wounds heal faster and scar less), then a fresh non-stick dressing, changed daily or when wet or dirty.
Check your tetanus status — a dirty or deep wound with a tetanus shot more than 5 years old warrants a booster call to the doctor; clean minor wounds are covered for 10 years.
Watch for infection for the first several days: increasing (not decreasing) pain, spreading redness, swelling, warmth, pus, red streaks, or fever — any of these means a doctor visit.
Most cuts and scrapes need nothing more than pressure, patience, and a clean dressing. The skill this lesson teaches is knowing — quickly and confidently — which wounds are in that category, and which ones aren’t.
Put it into practice
Training scenario:
You’re at a family cookout. Your cousin is slicing watermelon when the knife slips — a deep cut across her palm, bleeding steadily. She grabs a paper towel, presses it on, and within a minute it’s soaked through. Someone yells to run it under cold water; someone else says to hold her arm above her head. She looks at you.
Walking it through: neither suggestion, yet. Running water rinses away forming clots, and elevation isn’t how bleeding stops — pressure is. Add a clean cloth on top of the soaked paper towel (don’t peel it off), press firmly with your hand over hers, and hold without peeking for a full 10 minutes. While holding, look at the wound’s story: a deep palm cut that soaked its first dressing fast is a likely stitches case — plan the urgent-care trip now. If it were spurting bright red, you’d be calling 911 instead of planning a drive. Pressure first, assessment while you hold, escalation decided by what you saw — that’s the whole lesson in one cookout.
Medically reviewed by Dr. Mary Williams, RN, DC
Video transcript 1:30
0:00 In this video, I will demonstrate how to effectively stop bleeding and bandage a bleeding victim. Sometimes a bleeding wound looks
0:10 worse than it really is. A large vessel or arterial bleed can bleed profusely and needs first aid attention immediately. Bleeding from most mild to
0:23 moderate cuts or lacerations can be controlled with pressure. First, check for scene safety. If available, obtain the first aid kit.
0:34 Wash hands and wear gloves before applying a rolled bandage. Bandages are used to protect or cover a wound during healing. They can
0:43 also be used to apply pressure to stop bleeding. Apply a gauze dressing over the wound and apply direct pressure over the
0:51 wound that is bleeding. Apply a bandage over the dressings, and when wrapping an extremity with a rolled gauze bandage,
0:58 it's important to start at the distal end and work towards the proximal end. If the victim is alert and can help
1:07 apply pressure to a bleeding wound, ask them to help hold pressure where needed. If bleeding doesn't stop, apply more
1:15 gauze over the original dressing. Do not remove the original dressing. If clean gauze and first aid supplies are not available, use whatever
1:25 clean cloth is available to cover the wound and apply pressure.
Check yourself
Three questions on what you just read.